This is an old revision of the document!
Table of Contents
Developing Twine/Twee Games in Eclipse
Why?!?
Twine 1 is out of date and no longer worked on. Twine 2 is buggy and slow as hell, and the developer doesn't seem to do much to make it more useful for large/complex projects.
It is also extremely difficult to use external Javascript libraries in Twine.
Additionally, Twine saves the whole project in one huge file. This makes it extremely difficult to use version control and simultaneously collaborate on Twine projects.
The solution to these problems is a commandline Tweecode compiler called Tweego. Think “Twine without the graphical user interface.
Among other things, it allows you to:
- Split your project into multiple files, vastly simplifying the use of version control and collaboration.
- Create games of huge size without lagging the editor all to hell.
- Easily include external Javascript libraries.
- Compile images, sounds, and video directly into the .html file, greatly simplifying distribution.
Unfortunately, Tweego (being a commandline program) may be difficult or fiddly for some to use, and you also lose the graphical interconnected passage map.
In practice, losing the graphical passage map is a non-issue, as 99.9% of the time a story's scene structure isn't complex enough to require graphical visualization. (If it is, I'd suggest that you may have a design issue rather than a tool issue, anyway.)
Having to use the commandline to build the project after you save your work can be an issue for some. Even for those who are technically literate to develop software in this way, it can still be a time-sink to have to manually build the project every time you save something. This isn't just a Tweego issue, it's something that affects programming in general.
The solution to commandline use and manual building it to use an Integrated Development Environment (or “IDE”). An IDE automates and encapsulates many tools and tasks, making your workflow more efficient. Typically file management, text editing, and in many cases even version control are all brought together into one graphical tool.
Additionally, most IDEs provide “autobuild” functionality. That is, whenever you save a file, the IDE detects this and rebuilds your project so that it is immediately available to testing, without having to tab out to a command prompt and build the project by hand.
Unfortunately, there are no IDEs for Twee development. But there are many IDEs that can be made to work with it, kind of.
My personal favorite IDE is Eclipse. It was originally written as a Java IDE, but over time has been extended to work well with almost all common programming languages (except for C#, grumble). Many people don't like Eclipse. I happen to be one of those weirdos who likes it. It is an extremely large program, but it is very mature and has many plugins for about whatever you might want to use it for.
Unfortunately, it has no Twee plugin. But we can work around that, and turn it into a pretty decent Twee development environment that does about everything except for .twee syntax highlighting.
Installation and Setup
Step 1: Install Eclipse
Download the Eclipse installer from https://www.eclipse.org/ and run it. When it starts up, you'll be given a list of meta-packages to install, for different development environments. You want to install the Eclipse IDE for JavaScript and Web Developers.
Once it has been installed, launch it.
Eclipse will ask for a workspace location. This is where all of your projects will be saved. Go ahead and accept the default if you want to, but I prefer to change it to something a little easier to navigate to, such as “C:\EclipseWorkspace”. Regardless, remember where your workspace location is, because we'll have to navigate there and fiddle with some metadata in there later on.
Eclipse will grind for a moment, and then start up. You can go ahead and close the Welcome tab.
The IDE window is split into several panes, like so:

Step 2: Install Version Control Plugins (Optional)
If you don't know what version control is, well, don't worry about it too much. It's essentially a way to keep track of all the changes you make to your project over time, giving you the ability to roll back if you make a huge mistake. Also, version control generally catches and merges edit conflicts, which is a huge help if you are collaborating with other people on a project.
If you only want a file history that you can roll back, you may be able to just use a mounted Google Drive location for your workspace. I think Google Drive does versioning and rollback itself when you do that. But I've never tried it, so I could well be wrong.
If you do know what version control is, and want to use it, Eclipse comes with a Git plugin installed by default. If you are that kind of user, I leave it to you to find some tutorials and learn to use Eclipse's “Team” context menu and perspectives to get into Git. If you are a luddite like me and still use SVN, you'll have to install a 3rd party plugin, which I also leave to the advanced reader.
Step 3: Enable Word-Wrap by Default (Optional but Highly Recommended)
This is a pain in the ass. By default, Eclipse doesn't to word wrap, which is great for most programming languages. But not for Twee.
There is a button in the toolbar that toggle word wrap on and off:
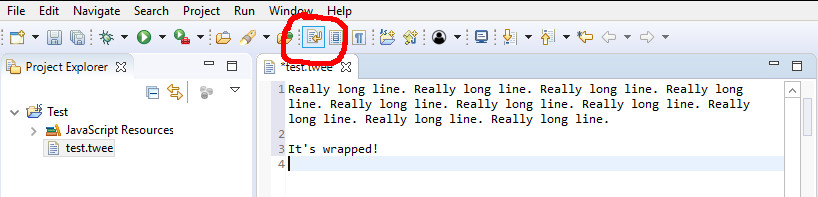
Unfortunately, this button toggles word wrap per file and its setting is forgotten when you close and reopen a file. This means that you'd normally have to manually toggle word wrap on every time you open a file. Which you can do. But it's a real pain in the ass.
Doubly unfortunately, there is no GUI preference setting to turn word wrap on by default.
However, we can manually turn on word wrapping by default, by editing a file.
Remember when we were talking about the workspace location, and I said to remember where that was? Ok, good. Tab out of Eclipse and go there. Go into ”.metadata/.plugins/org.eclipse.core.runtime/.settings/“.
There you'll find a file called “org.eclipse.ui.editors.prefs”. Open it in good ol' Notepad.
In that file, look for a line that reads “wordwrap.enabled=false”, and change it to “wordwrap.enabled=true”. If there is no such line, just add it at the end of the file.
Save the file, exit Notepad, and exit and restart Eclipse. Now whenever you open a file in that workspace, word wrap should be turned on by default.
This is a known bug with Eclipse, and they're supposed to be fixing it Sometime™. I'll update this document with something easier when they do.
Step 4: Install Tweego
Download Tweego and the story formats package from https://www.motoslave.net/tweego/.
At the time of this writing, Tweego and the story formats are only available as a .zip file. There is no automated installer. I like to install them to a path that is easy to find and remember (such as C:\Tweego\), because we'll need to manually set some paths and environment variables in eclipse later, when we set up autobuilding.
Step 5: Create Your Project
Go back to eclipse, and right click somewhere inside of the “Project Explorer” pane on the left.
Select New→Project from the context menu. Select “JavaScript Project” from the rolldown in the next screen (important), and click Next.
In the next window, fill in the Project Name at the top (required), and uncheck the “Include Web Browser Library” box below.
Then press Finish. Your project will come up in the Project Explorer to the left. Later on, you can create any number of projects here, if you wish, with separate version control repos and whatever.
Right-click on your project there, and select New→Folder. Name the new folder “src”, and hit Finish. This will create a “src” folder within your project.
Use the same procedure to create a “build” folder in your project, too.
Next, right click on the “src” folder that you just created, and select New→File. Name this file “Start.twee”. The file will be automatically opened in the editor pane.
Your project should now look something like this:

Step 6: Create a Couple of Test Passages
In that “start.twee” file, enter something like this:
:: Start

Ohai, this is the start passage.

[[Next Passage]]


:: Next Passage

Welp, you got to the next passage.  You win!!!